This final part of the 2 parts is to try to show how to get all the benefits of Part 1 with out deploying the xaml file along with the binaries.
There are two main things that you need to change.
1) Build Action & Copy to Output Directory
Build Action = Resource
Copy to Output Directory = Do not copy
2) Is of course the code in program.fs.
open System
open System.IO
open System.Windows
open System.Windows.Controls
open System.Windows.Markup
//again do not include the tick marks below in sta-thread attribute.
['<'STAThread'>']
do()
let uri = new System.Uri("/WPF_with_Xaml;component/MainView.xaml", UriKind.Relative)
let window = Application.LoadComponent(uri) :?> Window
(* Hook into xaml elements here *)
let why = window.FindName("Why") :?> Button
let answer = window.FindName("answer") :?> TextBlock
(* Handle click event on Why button *)
do why.Click.Add( fun _ -> answer.Text <- "Because F# works with Xaml!!" )
ignore <| (new Application()).Run window
A few things to note when implementing this way.
1) The performance is much slower because the framework has to convert the xaml to baml first.
One way around that would be to obviously have the baml ready to go.
2) If the slightly slow startup is not an issue for you then you get the added benefit of not having to deploy
the xaml file. :-)
Until next time...
Develop with passion
Monday, February 28, 2011
WPF using only F# and Xaml Part 1
In my early days of researching F# I spent quite a bit of time looking for code to read or download.
Early on I came across two really clean ways of interacting with Xaml from F#. The first and simplest way
is what I'll focus on in this post. So first things first - lets fire up VS2010 or VS2008 and create a new F# project. I started with the WPF template which is available in the VS gallery in VS2010, but if you don't have the template it's no big deal. Just create an F# console application and under the project type change it to windows application and you should be good to go.

Next thing you want to do is add a new item to the project. You will not see an option to add a .xaml file
so you will have to type it in. For the sake of this blog post just name the item MainView.xaml and add to the project.

Initially, visual studio knows about the xaml file so it tries to display the designer. The problem you'll see
is the designer shows warnings, which basically means that their is no xaml to display. So at this point all you need to do is copy and paste either a block of xaml which represents a window or a user control.
For this post I'll use some xaml that I generated from expression blend 4.

You'll notice in the circled area that there is no x:Class attribute which indicates the code behind file.
This removes some complexity with getting F# to see the block of xaml. I'll cover that in part 2.
The next part is to right click on the xaml file in the project and click on Properties set two properties on the file itself.
1) Set Build Action = None
2) Copy to output directory = Copy if newer

Now we should be ready to add the necessary assemblies to the project and starting writing some code.
The assemblies that you'll need are the follow...
- PresentationCore
- PresentationFramework
- System
- System.Xaml
- System.Xml
- UIAutomationTypes
- WindowsBase
Now the code... in the program.fs file just add the following code below.
open System
open System.IO
open System.Windows
open System.Windows.Controls
open System.Windows.Markup
(* Special thanks to Luke Hoban for providing the twitter app sample (From TechEd 2010)
which demonstrates this technique *)
(* http://blogs.msdn.com/b/lukeh/ *)
//the tick marks are just for this blog post (do not include these in the actual code) :-)
['<'STAThread'>']
do()
let window = XamlReader.Load(File.OpenRead("MainView.xaml")) :?> Window
(* Hook into xaml elements here *)
let why = window.FindName("Why") :?> Button
let answer = window.FindName("answer") :?> TextBlock
(* Handle click event on Why button *)
do why.Click.Add( fun _ -> answer.Text <- "Because F# works with Xaml!!" )
ignore <| (new Application()).Run window
That's essentially all that is needed to code an even quicker wpf application in F#. Again, this is not the only
way to do this but it is a simple and clean way to do it for a quick view or app.
Until next time...
-Develop with passion
Wednesday, December 15, 2010
What Protovis might look like through an F# Lens
Recently, the development team received the ComponentOne Studio for WPF control suite.

Since I love F# and data visualizations I thought to myself that it might be cool to have a Protovis style API for the Charting controls. So I started hacking and surprisingly came up with the following F# Script :
#r @"C:\Program Files (x86)\ComponentOne\Studio for WPF\bin\Design\C1.WPF.C1Chart.dll"
#r @"C:\Program Files (x86)\Reference Assemblies\Microsoft\Framework\v3.0\PresentationFramework.dll"
#r @"C:\Program Files (x86)\Reference Assemblies\Microsoft\Framework\v3.0\WindowsBase.dll"
#r @"C:\Program Files (x86)\Reference Assemblies\Microsoft\Framework\v3.0\PresentationCore.dll"
open System
(* ==== Charting references ==== *)
open System.Windows
open System.Windows.Controls
open C1.WPF.C1Chart
(* create a panel (or blank charting control) *)
let Panel = new C1Chart()
(* Panel Width *)
let width (w: float) (p: C1Chart) =
p.Width <- w
p
(* Panel Height *)
let height (h: float) (p: C1Chart) =
p.Height <- h
p
(* Chart Type *)
let add (ct: ChartType) (p: C1Chart) =
p.ChartType <- ct
p
(* Data *)
let data (d: List) (p: C1Chart) =
let ds = new DataSeries()
ds.Values <- new Media.DoubleCollection(Seq.ofList d)
p.Data.Children.Add ds
p
(* Render *)
let render (c: C1Chart) =
let content = c
let grd = new Grid()
grd.Children.Add(content) |> ignore
new Window(Title = "Protovis Via F#", Content = grd)
let vis =
Panel
|> width 150.0
|> height 150.0
|> add ChartType.Column
|> data [1.0; 1.2; 1.7; 1.5; 0.7; 0.3]
|> render
[] ignore <| (new Application()).Run vis
As you can see from the above script, it really isn't all that difficult to get the same style API.
I just replaced the . or (Dot) function from the Protovis API with the standard F# pipeline operator / function.
Below is a screen shot of the above script which is the first sample in the "Getting Started" section on the Protovis site.
Monday, November 15, 2010
Consuming OData Feed from F#
Sadly, there is no tooling around generating an OData service proxy in F# (that I know of).
In order to work around it I created a new C# class library project and used C# to generate a service proxy to any OData feed. I decided to use Netflix.com and Nerd Dinner.com as examples. Once I had the proxies
in C# I built an ODataServiceProxies.dll and referenced it in a F# script file.
#r @"C:\Program Files (x86)\Reference Assemblies\Microsoft\Framework\.NETFramework\v4.0\System.ServiceModel.dll"
#r @"C:\Program Files (x86)\Reference Assemblies\Microsoft\Framework\.NETFramework\v4.0\System.Data.Services.dll"
#r @"C:\Program Files (x86)\Reference Assemblies\Microsoft\Framework\.NETFramework\v4.0\System.Data.Services.Client.dll"
#r @"D:\ODev Solutions\ODataServices\ODataServiceProxies\bin\Debug\ODataServiceProxies.dll"
open System
open System
open System.Linq
open System.Reflection
open System.Collections
open System.ServiceModel
open System.ServiceModel.Syndication
open System.Xml
open System.Collections.Generic
open System.Data.Services
open ODataServiceProxies.NerdDinner
open ODataServiceProxies.NetflixCatalog
open System.ServiceModel.Activation
let netflix = new NetflixCatalog(new Uri("http://odata.netflix.com/v1/Catalog/"))
(*Showing some movie titles from netflix feed*)
netflix.Titles.AsQueryable()
|> Seq.iter(fun t -> printfn "%s" t.Name)
(*Showing some nerd dinners from NerdDinner.com feed*)
let nerddinner = new NerdDinnerEntities(new Uri("http://www.nerddinner.com/Services/OData.svc/"))
nerddinner.Dinners.AsQueryable()
|> Seq.iter(fun d -> printfn "%s" d.Description)
Very Cool!! I love F#!
More F# Findings
I spend quite a bit of time reading other F# related content mainly from experts of the field.
It's definitely a great way to learn, but sometimes I get really annoyed when people put out some really great F# code only to visualize it with a sad presentation framework like Windows Forms. People... it's 2010 soon to be 2011! We need to start educating everyone on better presentation. I've decided to side track the MATLAB series and just start posting some random findings of mine through playing around in scripts with WPF and Silverlight. The hope is that someone will see something and get something out of it. If not, then at least I can contribute to more F# with WPF and Silverlight content out in the inner webs.
This first discovery is Silverlight related. I'm working on a side project and came across a need to draw a path. So I turned to the following article and decided to re-think and re-do it in F#.
Special thanks to Tomas Petricek for the Utils module logic to lookup Xaml elements in F#.
( Utils.fs )
module Utils
open System.Windows.Controls
let (?) (this : Control) (prop : string) : 'T =
this.FindName(prop) :?> 'T
( Main.fs )
namespace DrawingAPath
open Utils
open System
open System.Windows
open System.Windows.Controls
open System.Windows.Ink
open System.Windows.Input
open System.Windows.Media
type MainView() as this =
inherit UserControl()
let uri = new System.Uri("/DrawingAPath;component/MainView.xaml", UriKind.Relative)
do Application.LoadComponent(this, uri)
let mutable s = new Stroke()
let inkP: InkPresenter = this?inkP
let pv: ListBox = this?PointsViewer
let AddPoints (pX: float, pY: float, device: StylusDevice) =
s.StylusPoints.Add(device.GetStylusPoints(this?inkP))
let DefineInkStroke (ev: MouseButtonEventArgs) =
inkP.CaptureMouse() |> ignore
s = new Stroke() |> ignore
s.StylusPoints.Add(ev.StylusDevice.GetStylusPoints(inkP))
s.DrawingAttributes.Color = Colors.White |> ignore
inkP.Strokes.Add(s)
let DisplayPointsForPath (ev: MouseButtonEventArgs) =
let points =
s.StylusPoints
|> Seq.map(fun sp -> String.Format("X: {0} Y:{0}",sp.X,sp.Y))
pv.ItemsSource <- points
s <- null
do
inkP.MouseLeftButtonDown.Add(fun ev -> DefineInkStroke ev)
do
inkP.MouseLeftButtonUp.Add(fun ev -> DisplayPointsForPath ev )
do
inkP.MouseMove
|> Event.map(fun me ->
let pos = me.GetPosition(this?LayoutRoot)
pos.X, pos.Y, me.StylusDevice)
|> Event.filter( fun (pX , pY, sd) ->
pX > 0.0 && pX < 300.0 && pY > 0.0 && pY < 195.0)
|> Event.add(AddPoints)
Thursday, September 16, 2010
MATLAB to F# Part 1
So I bought the book and brought it home. I couldn't wait to get started but life came into the picture so I had to help make dinner with the wife and kids and then eat dinner. After getting the kids into bed and watching the first five minutes of the wife's favorite T.V. show with her I finally got a chance to come down stairs and get into this a little bit. So, not having any experience with MATLAB I decided to start from the beginning of the book and work my way forward. Since this is MATLAB we need to familiarize ourselves with a few core data structures that will be used heavily through out MATLAB. Vectors & Matrices. In MATLAB vectors are just a simple list in F# and Matrices are essentially tables of vectors also known as list of list in F#. Let start with a few simple examples from chapter 1 of the book.
#r @"C:\Program Files (x86)\FSharpPowerPack-1.9.9.9\bin\FSharp.PowerPack.dll"
open Microsoft.FSharp.Math
Not to shabby, of course we could accomplish the same thing in .NET using F# and WPF.
So I thought about it and decided I did not want to write my own charting component just for the
blog post series. Especially since I've had the first build (and free release) of Visifire for WPF & Silverlight still laying around on my hard drive. :-)
So with the decision made to leverage visifire I produced the following F# code below :

1.5.1 Creating Row Vectors
There are several ways to create row vector variables. The most direct way is to put the values that you want
in the vector in square brackets, separated by either spaces or commas.
>> v = [1 2 3 4]
v =
1 2 3 4
1.5.2 Creating Column Vectors
One way to create a column vector is by explicitly putting values in square brackets, separated by semicolons:
>> c = [1; 2; 3; 4]
c =
1
2
3
4
1.5.2 Creating Matrix Variables
Creating a matrix variable is really just a generalization of creating row and column vector variables.
The matrix variable mat is created by explicitly typing the values.
>> mat = [4 3 1; 2 5 6]
mat =
4 3 1
2 5 6
These core data structures are built in to F#, well the F# Powerpack.
So you can find the F# powerpack at codeplex. Once you download it you can easily open up a script file
and start creating your own vectors and matrices.
#r @"C:\Program Files (x86)\FSharpPowerPack-1.9.9.9\bin\FSharp.PowerPack.dll"
open Microsoft.FSharp.Math
Creating Row Vectors (in F#)
let rowvector = [1.0; 2.0; 3.0; 4.0]
Creating Column Vectors (in F#)
let onecolumnvector = Matrix.ofList [[1.0];[2.0];[3.0];[4.0]]
Creating a Matrix (in F#)
let matrix = Matrix.ofList [[4.0;3.0;1.0]; [2.0;5.0;6.0]]
let rowvector = [1.0; 2.0; 3.0; 4.0]
Creating Column Vectors (in F#)
let onecolumnvector = Matrix.ofList [[1.0];[2.0];[3.0];[4.0]]
Creating a Matrix (in F#)
let matrix = Matrix.ofList [[4.0;3.0;1.0]; [2.0;5.0;6.0]]
With the simple stuff out of the way I wanted to go a little deeper... so on to chapter 2 (Graphical Displays).
Now that we know how to create the data let's do something interesting with it... e.g. visualize it!
One way to visualize the data is to display it on a standard 2D chart with X and Y coordinates. In MATLAB you'd typically use the "built in" Plot function which (by definition thus far) can plot a single x,y coordinate or optionally two vectors of coordinates representing x and y. So in MATLAB will create a couple of vectors representing x and y. To do this we lay down the following expression :
>> x = 1:6;
>> y = [1 5 3 9 11 8]
The x vector above may look a little strange but basically what were doing is creating a vector from 1 to 6 with a step of 1. So the x and y column vectors above would look like this in the MATLAB command window.
x , y
(1 , 1)
(2, 5)
(3, 3)
(4, 9)
(5, 11)
(6, 8)
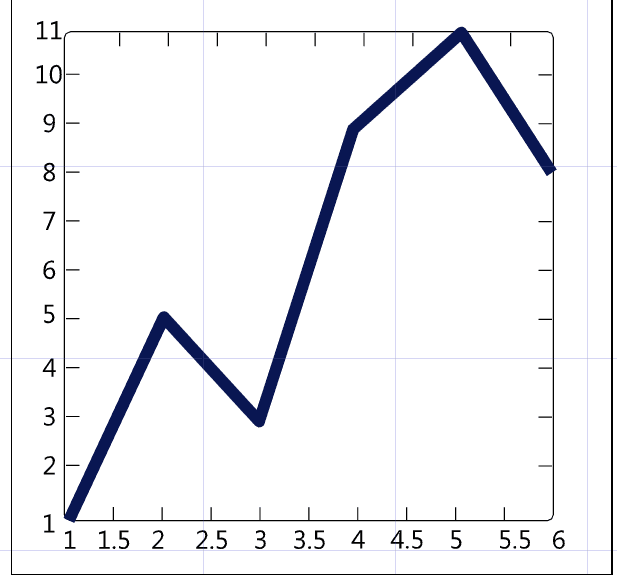
Finally, we'd plot the vectors with the following expression :
>> plot (x , y)
It's worth noting that under the covers MATLAB is actually creating a 2D chart, plotting all the points or coordinates in both vectors, and then displays the 2D chart in a new window.
Here is the following MATLAB output.

Now that we know how to create the data let's do something interesting with it... e.g. visualize it!
One way to visualize the data is to display it on a standard 2D chart with X and Y coordinates. In MATLAB you'd typically use the "built in" Plot function which (by definition thus far) can plot a single x,y coordinate or optionally two vectors of coordinates representing x and y. So in MATLAB will create a couple of vectors representing x and y. To do this we lay down the following expression :
>> x = 1:6;
>> y = [1 5 3 9 11 8]
The x vector above may look a little strange but basically what were doing is creating a vector from 1 to 6 with a step of 1. So the x and y column vectors above would look like this in the MATLAB command window.
x , y
(1 , 1)
(2, 5)
(3, 3)
(4, 9)
(5, 11)
(6, 8)
Finally, we'd plot the vectors with the following expression :
>> plot (x , y)
It's worth noting that under the covers MATLAB is actually creating a 2D chart, plotting all the points or coordinates in both vectors, and then displays the 2D chart in a new window.
Here is the following MATLAB output.
Not to shabby, of course we could accomplish the same thing in .NET using F# and WPF.
So I thought about it and decided I did not want to write my own charting component just for the
blog post series. Especially since I've had the first build (and free release) of Visifire for WPF & Silverlight still laying around on my hard drive. :-)
So with the decision made to leverage visifire I produced the following F# code below :
#r @"C:\\Users\\cfrederick\\Documents\\Visual Studio 2010\\Projects\\MATLAB Discoveries\\lib\\visifire\\WPFVisifire.Charts.dll"
#r @"C:\\Program Files (x86)\\Reference Assemblies\\Microsoft\\Framework\\v3.0\\PresentationFramework.dll"
#r @"C:\\Program Files (x86)\\Reference Assemblies\\Microsoft\\Framework\\v3.0\\WindowsBase.dll"
#r @"C:\\Program Files (x86)\\Reference Assemblies\\Microsoft\\Framework\\v3.0\\PresentationCore.dll"
open System(*Charting references*) open Visifire.Charts open System.Windows open System.Windows.Controls
//Plot function, used to plot a single data pointlet plot x y = let dp = new DataPoint() dp.XValue <- x dp.YValue <- y dp
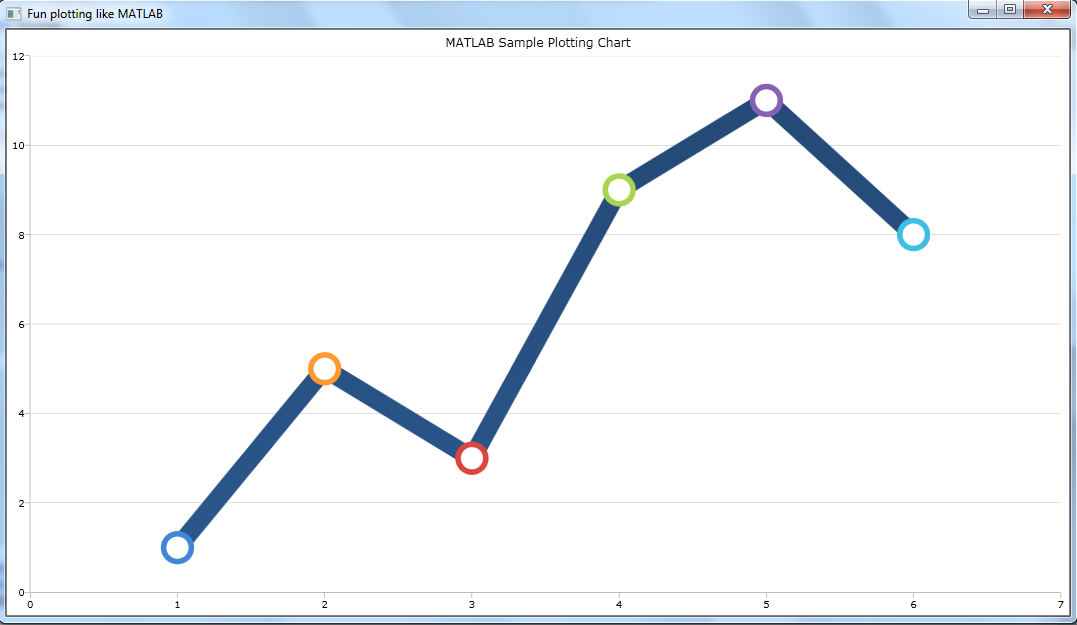
let createChart xs ys =
  let chart = new Chart()
  let title = new Title()
  title.Text <- "MATLAB Sample Plotting Chart"
  chart.Titles.Add title
  chart.Watermark <- false

  let data =
   let dataseries = new DataSeries()
   dataseries.RenderAs <- RenderAs.Line
    List.zip xs ys
     |> List.map(fun (x,y) -> plot x y)
     |> List.iter(fun dp -> dataseries.DataPoints.Add dp)
    dataseries
    chart.Series.Add data
   chart
let content = createChart [1.0..6.0] [1.0;5.0;3.0;9.0;11.0;8.0] let window = new Window(Title = "Fun plotting like MATLAB", Content = content)
[] ignore <| (new Application()).Run window
And here is the final output from FSI and VS2010.
Thursday, September 9, 2010
Introducing MATLAB -> ( F# & WPF ) Series

My latest purchase a few days ago was at Borders book store. I went in the store looking for a specific WPF charting book which covers visualizing mathematical formulas. No such luck. However, after turning my attention to the core computer science section, I found the following book on MATLAB (short for" matrix laboratory"). I was never really strong in math and this book seems to be a nice self guided introduction which works up to some advanced data analysis/visualizations. Since I'm constantly looking for core computer science type approaches from a functional perspective I figured this is a good choice. My plan is to obviously teach myself MATLAB but also translate the MATLAB functions over to F# and move the graphical stuff over to WPF. For the last 8 years I've been doing hardcore imperative programming using mainstream languages. More and more every day I wish I where doing functional programming using (F# of course) or something like ML,OCaml, or dare I say Haskell. My long term plan is to teach myself core functional programming so that I can get a job which safely transitions into the functional programming world. My dream job would be to write core functional programs while having the freedom to visualize them using a great presentation framework like WPF. As the title says, I will be going through the chapters & exercises and presenting them here. I will take as much time as I can to produce good quality posts on this topic. You can expect the format to be something like the following: MATLAB source and screen shots( if any), followed by F# source, followed by WPF screen shots. Any way, I'm looking forward to learning MATLAB and sharing my discoveries here on my blog.
-Stay tuned and keep on dev'n
Subscribe to:
Posts (Atom)